Getting Started with GraphQL and Node.js Made Simple - How We Innovated Our App


If you ever wondered how to get started with developing GraphQL API using Node.js, you are reading the right article. We will learn just enough to help you get started developing real world APIs. If GraphQL doesn’t sound familiar to you or you want to find out why it might be the best way to serve data in complex applications, we have an article about it here.
Here Is What We Are Building
At Netguru, we have an app called Profile, which we use in the process of assigning developers to projects. The app’s main function is searching for Netguru staff members with particular skills (e.g. GraphQL), which are regularly updated within the app, or searching for complete teams (e.g. a list of every front-end developer in our company).
Profile’s role in managing teams at Netguru grew rapidly in recent months and that’s where the idea to make a mobile version came from - along with the notion to create a brand new API for it. We’re building an app with React Native and we have chosen Node.js and GraphQL for the backend.
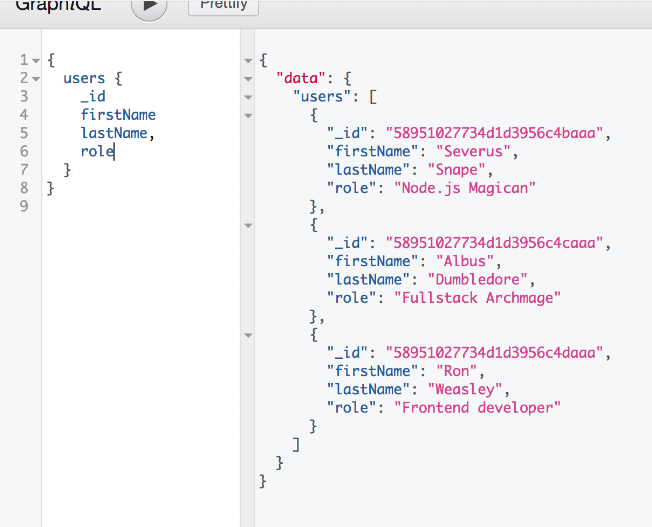
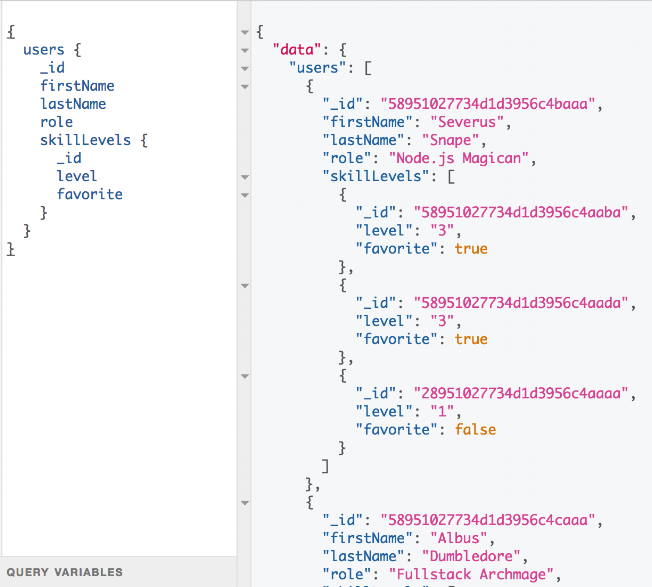
In the image below you can see how our API works. We will query available skills in Netguru, then check how good certain users are at them.
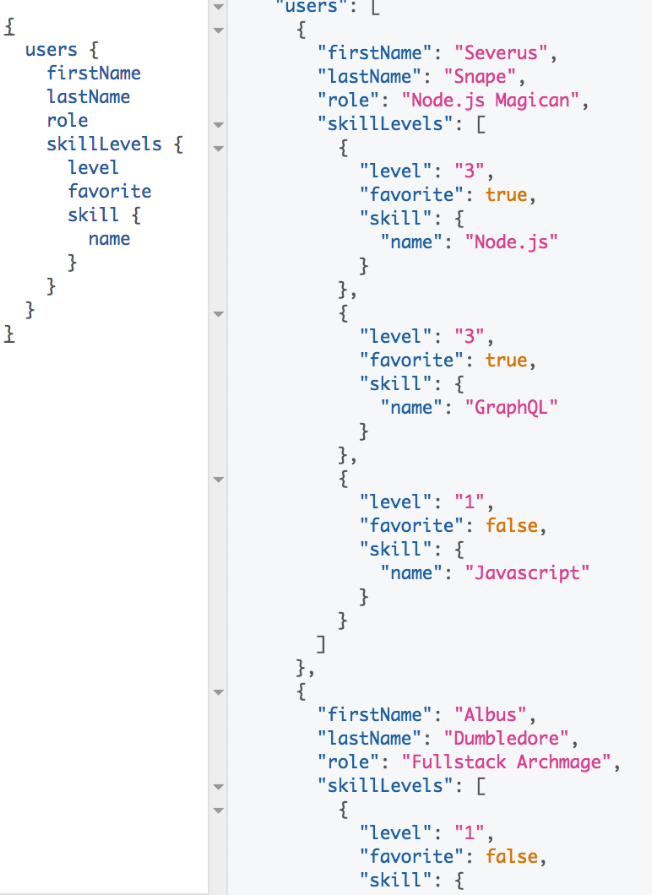
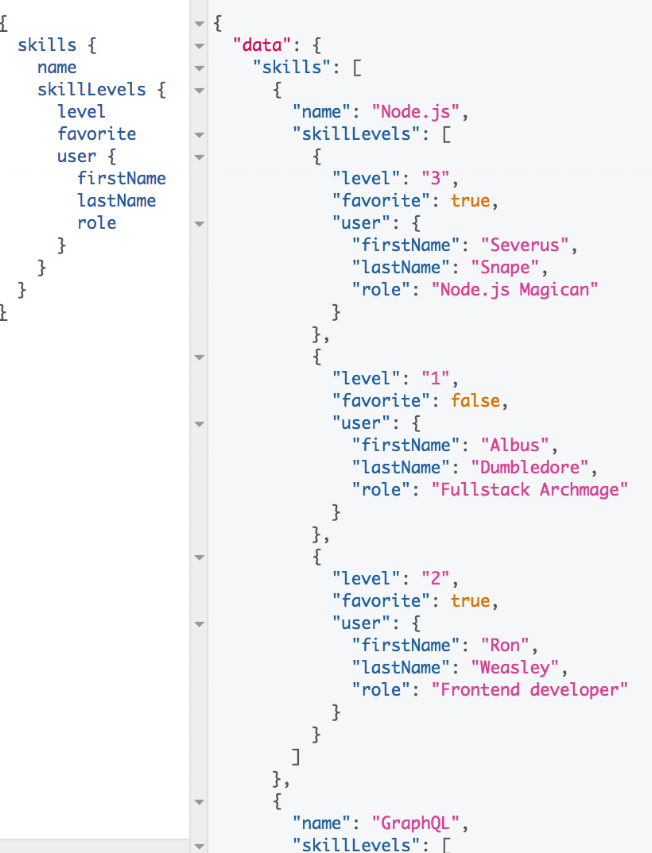
What you can see above is an example query constructed on the fly. On the left side we can see the fields we are asking for, and on the right there is our API’s response: our retrieved data. We can query for other fragments of our data and it will work. Take a look:
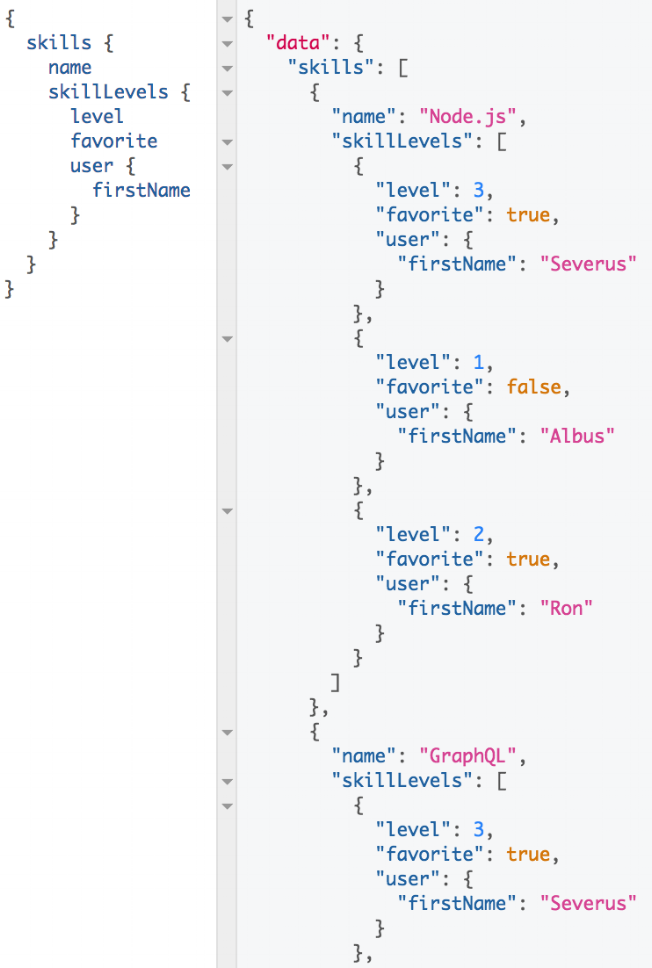
This way we can request just the right amount of data without having to create countless endpoints. We are about to find out how it’s done, so get ready.
Prerequisites
Before getting started, you should have Node.js installed, preferably the newest stable version.
We have eslint in our project because it will allow us to keep the code clean. We have included precommit to avoid committing code that does not pass elint tests. We are going to use es6 and its awesome features, so if you aren’t familiar with es6, you might want to watch videos like this one and this one.
We’re using MongoDB as our database. We’ll use Mongoose.js to allow searching for related documents. For storing the data online we will use MongoLab. We’ll need babel and webpack to translate es6 to older versions of JavaScript and they are already set up so we can start coding in the JavaScript of the future right away. Our data will come from seeds which will populate the database using a predefined script.
Setting Up The Server
The first thing we are going to do is download the tutorial starting point from Github and install it’s dependencies.
Open up a terminal and type:
git clone git@github.com:netguru/netguru-graphql-tutorial.git
cd netguru-graphql-tutorial
npm i
Once we are in our application folder and we have dependencies installed, we will need to set up the database. Our application uses MongoDB and that’s what we are going to use in the tutorial. We will store our data online using the cloud database service MongoLab.
Head to MongoLab and create an account (it’s free). Now create a new deployment and pick the following options:
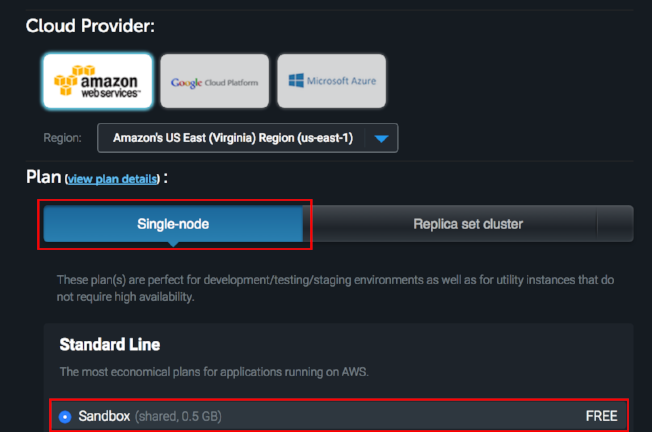
Once you pick a name click ‘Create New MongoDB deployment’. We need to create a user now so click on the newly created deployment and click on the Users tab. Use a password you’ll remember since you will need to connect to the database.

Voila, now all we need to do it is copy the link from here:
We will use it in a second!
Now open a project in your favorite text editor (I’m using Atom) and create a file named mongoLabLink.js in the server folder, then paste the link like in the picture below with words ```export default```. Make sure to use your MongoLab deployment name as well as your user and password. If you had a deployment called glorious-database with the user ‘hamsterFeeder’ and the password ‘hamster123’, your exported the link would look like this
export default 'mongodb://hamsterFeeder: hamster123@ds113630.mlab.com:<id of your deployment, on the picture above you can see my id was 13630>/glorious-database';
Now run:
npm start
You should see something like this in your console:
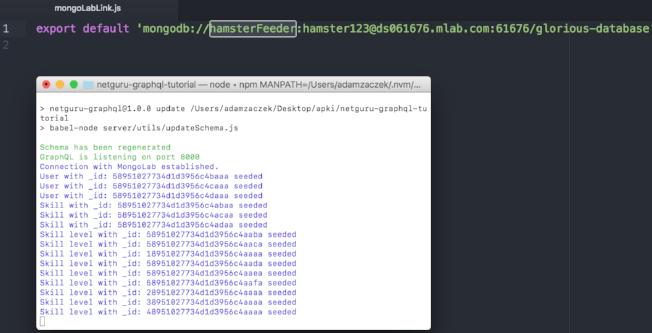
I created a script which will place seed data on your server. If you visit your MongoLab deployment you’ll see three collections named users, skills and level_skills. As you can see in the console we can also visit our GraphiQL on port 8000. GraphiQL is an API used to test GraphQL endpoint by providing access to it and visualizing returned data. On top of that it supports autocompletion and provides descriptions of our requested fields.
The next part of the tutorial will deal with working on creating ways to query our data as we please.
Now beware! We will experience what is probably the most sophisticated API on the market, GraphiQL. Visit localhost:8000 in your browser to see what it looks like.
Working with Queries
Type { helloQuery } in the left section of the GraphiQL. Here is the query during typing:
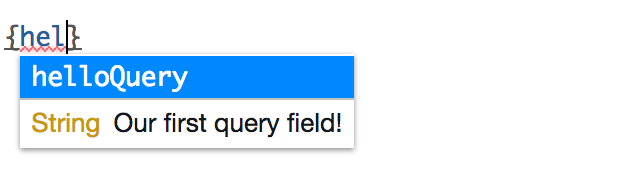
You should see the automatic documentation system in action. Not only is the data we request strongly typed, but we can also see what types will return from the query. On top of that, every field can be described as we please and that description will be visible. Queries are capable of much more than we can cover in one article so you might want to read about them here.
At this point we have one query field defined and it doesn’t really do anything useful, so we can truly start developing our schema from the very start.
We need to add a query field for users. GraphQL defines a set of types which we can use to describe our user. To put it simply, we can say that user has a field firstName which is of type string. Types are well explained in official documentation. You can learn about them here in case you want some more insight on what they are.
We will now create a GraphQLObject type for user. To see what kind of fields user might have, visit server/appData/models/user.js. What we have there is a model and it tells you that user can have fields such as: firstName, lastName, role and _level_skills.
The _level_skills field returns an array of identifiers and we will handle it soon. For now we will only handle four fields which are _id, firstName, lastName, role.
Here is our user model:
We can now create a call to MongoDB to call for all users in the database. We need to import GraphQLList for this to work. This is our import statement for now:
Now we can add a new object argument to the fields function. Simply copy this piece of code:
To see if everything works, restart the server in the terminal.
Run ctrl + c and then npm start.
If something doesn’t work, fear not, here is our complete schema so far:
Disclaimer! You might need to reload the GraphiQL window in your browser to see a new query field.
Now visit http://localhost:8000/. You can now call users query, check it out!
What we want to do is find out how good each of our users is at each programming skill. We do not have a field of either the skill level or the skill type yet, so we can’t query against that just yet. Let’s fix that!
Adding the Skill and Skill Level Types
Note: Skill level model has a favorite field which is a boolean so we will need to import GraphQLBoolean just like we did with GraphQLList. We also need GraphQLInt for level field since we describe skill in integers.
Here are our current imports:
Here are our types:
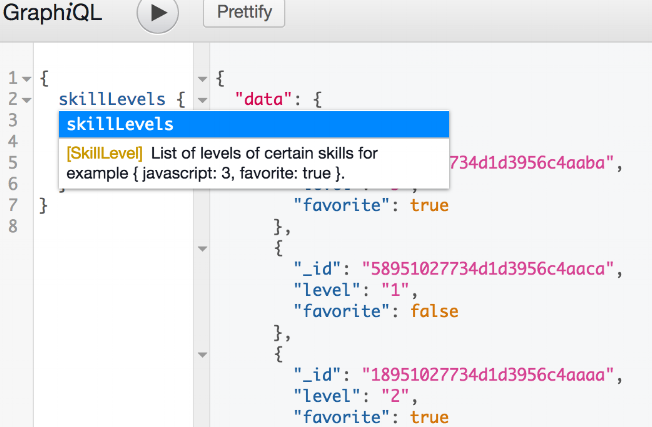
To check if our changes are working type ctrl + c in the terminal, then type npm start and reload localhost:8000 in the browser. You will see skills and skillLevels in available queries. Also notice that we are informed about what types they return, like this:
We are ready to do what we initially intended to do, which is displaying skill levels assigned to our users.
To do that we will need our skillLevel field to return a list of objects(skill levels). This might sound confusing but just take a look at the example:
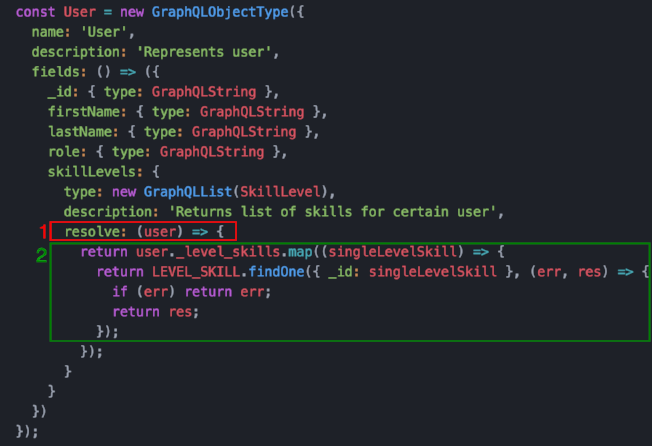
The resolve function takes a few arguments but in this case we only care about the first one, which reflects what is passed down to the type. In our example it’s simply what we have fetched under the USER model.
Next, we find skill levels corresponding to identifiers and put them on a list. This way we have a list of skill level objects.
In case you want to copy the code to see how it all works for you, here is or user type:
We can now see skill levels of our users. Take a look.
We can mirror our logic to search for skill levels in an organization. It will be useful if we need to know how many decent Node.js and GraphQL developers we have. In case you are here for copypasting the code, here’s our upgraded Skill type:
To be able to query the fields as we please we should look for the owner of the skill_level field and the rated skill. We can do this with very little code.
With this, everything should be working nicely. If you reload the app and refresh GraphiQL, you will be able to query our data as in the first examples:
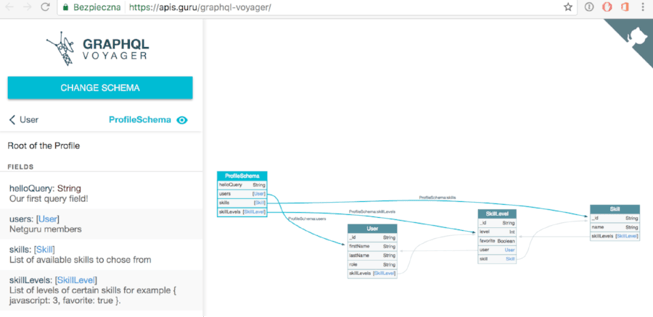
Here is our entire schema structure visualized using amazing graphql-voyager:
Wrapping up
We’ve learned how GraphiQL (not to be mistaken with GraphQL) helps with documenting API.
We know how GraphQL’s strong typing works and we got to know some of the built-in types.
We can create objects and lists and query data as we please.
In case you got stuck at any point, you can find the complete code in a completeSchema branch. Simply commit your changes and type:
text
git checkout completeSchema
There are many subjects left to be discussed, such as creating mutations, preventing N+1 queries with an amazing data-loader library, using arguments like limits in queries, authentication or using
query variables. Now that you know the basics, getting started with learning about all of them should be easy.
We’re only adding GraphQL to existing applications when it’s the easiest and most efficient thing to do. We don’t scrap or destroy solutions that are already there and working - instead, we build up by taking the mobile app further with GraphQL. Thus, we’re taking full advantage of our assets and creating new value. Consider whether that’s not the best option for your business, too.


%20_HD.jpg?width=384&height=202&name=DSC_7814%20(1)%20_HD.jpg)